Level 1463 · Completion reviewed
Color Block Jam Level 1463The two C shapes and twin frozen exits
The cyan and dark-green C shapes cannot simply be pushed down at the start: both lower central exits show 10. Make room with the smaller bars first. The route brings the C shapes into the centre only after the lower counters have fallen.
BEFORE YOU START
Does this match your board?
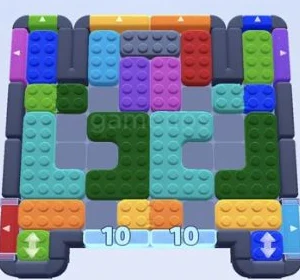
- Cyan C in the centre-right; dark-green C in the centre-left.
- Two neighbouring cyan exits marked 10 along the bottom.
- Orange/yellow horizontal bars cover the bottom; two stone cells sit across the upper middle.
Different board? Use the screenshots, not just the level number. Stop if the shapes or gates do not match.
Recorded route starts at 0:00 ↗FOLLOW THE ORDER
Your route, one checkpoint at a time
0 / 4 Checkpoints completed
Each image shows the target for that section. Open the video at the beginning of the section for the individual drags, then compare your position with the image.
- 01
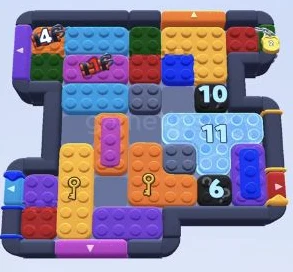
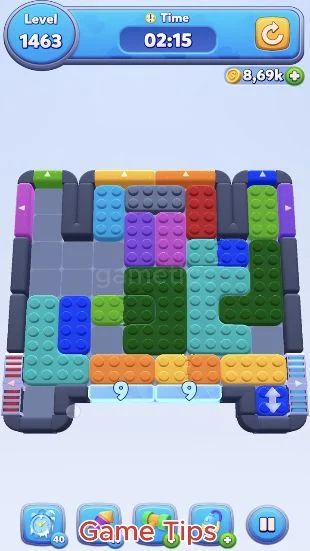
Release the upper-left column
The blue vertical piece has left the top-left pocket, giving the cyan pieces space on that side. The purple pieces stay near the top middle. The two lower exit counters should now both read 9; keep the large C shapes away from those gates for now.
Watch this section · 0:00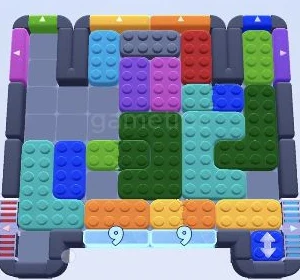
Checkpoint · 0:36Game Tips - 02
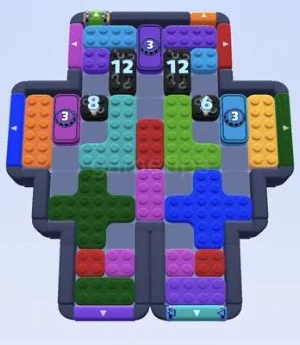
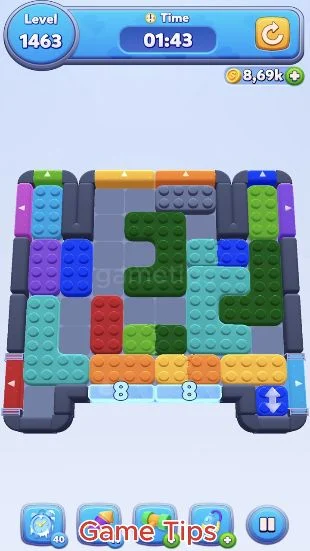
Move the dark-green C upward
Bring the dark-green C into the upper middle and use the left half to hold the smaller vertical pieces. The cyan C still sits on the right. The bottom counters read 8, so this is a positioning phase, not the final descent.
Watch this section · 0:36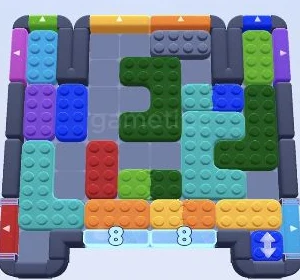
Checkpoint · 1:12Game Tips - 03
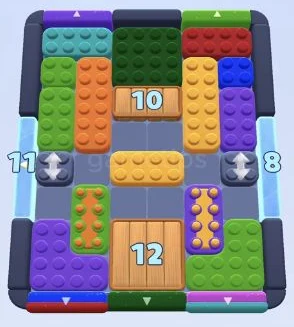
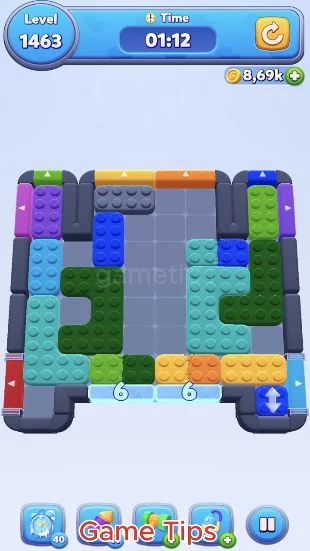
Reopen the centre
The dark-green C has shifted back to the left, opening a clear column in the middle. Keep the cyan C on the right while the smaller pieces use this passage. Match the pair of lower counters at 6 before continuing.
Watch this section · 1:12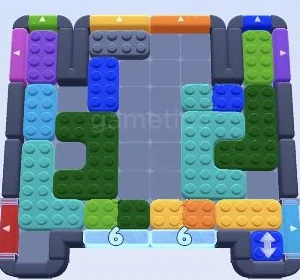
Checkpoint · 1:48Game Tips - 04
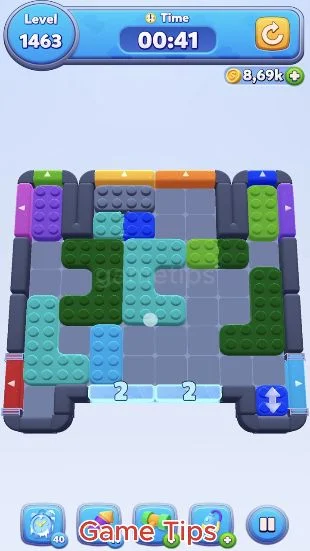
Stage the two C shapes side by side
The cyan C is now in the middle and the dark-green C is on its left; the large green L remains on the right. The lower gates show 2. Keep the bottom area clear while the remaining small pieces reduce those counters and open the exits.
Watch this section · 1:48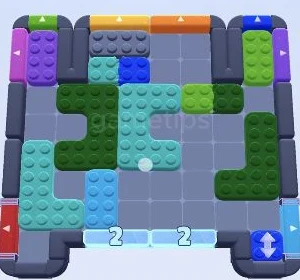
Checkpoint · 2:25Game Tips
Completion screen at 2:58
Game clock at completion: 00:14. Watch this section ↗
Your checklist stays in this browser. It is not a score or a visitor count.
Where this board can go wrong
- Do not use the central bottom gates while they still show numbers. This route spends the opening on smaller clears.
- The C-shaped pieces need an empty cell inside their outline as well as room outside it. Compare their exact shape, not just their colour.
- When the counters reach 2, the large shapes still need rearranging. A low counter is not permission to force a blocked exit.
Original recording
The screenshots and checkpoints were reviewed from one published Game Tips recording. They do not establish the layout of every app version. Use the original video for each individual drag.
Game Tips recording · Level 1463 ↗HELP IMPROVE THE ROUTE
Report a different board or a route issue
Tell us your level, which shapes differ, and where the route stops. You can attach a screenshot in the discussion. Comments are public and require a GitHub account.